Advanced Non-Destructive Testing (NDT)
Phased Array
Phased Array is an advanced ultrasonic testing method used to examine equipment for cracks or flaws. While conventional ultrasonics employs a single ultrasonic element to produce an unfocused beam, phased array uses multiple elements to produce an unlimited number of beams from a single probe position. This allows the instrument to sweep through a large volume of material at a high speed without moving the probe.
CIMAs phased array testing produces results that are more precise than conventional methods and detects a variety of volumetric flaws, including inherent process and service discontinuities.
In addition to producing accurate results, phased array inspection is safe, involving no chemicals or radioactive materials and can be performed without halting production.
Advantages over Conventional Ultrasonics
Precision: Displays more data and eliminates operator positioning errors, resulting in better accuracy and defect characterization.
Repeatability: Eliminates the need to manually manipulate the probe, resulting in more consistent data. Clients can track changes and growth of previous discontinuities with the utmost confidence.
Traceability: Raw data can be stored digitally and securely, without degrading over time.
Speed: Electronic processing of the ultrasonic signal translates into rapid acquisition and analysis, boosting productivity without sacrificing accuracy.
Advantages Over Radiography
Safety: Eliminates the risk of harmful radiation exposure, as well as the need to store radioactive materials onsite.
Productivity: Prevents work stoppages due to mandatory radiation boundaries and exclusion zones.
Onstream Capabilities: Not impeded by liquids or most other materials; can be conducted while equipment is in service.
Accuracy: Increased detection of planar discontinuities, which are the most detrimental flaws to pressurized or loaded components.
Phased Array Techniques
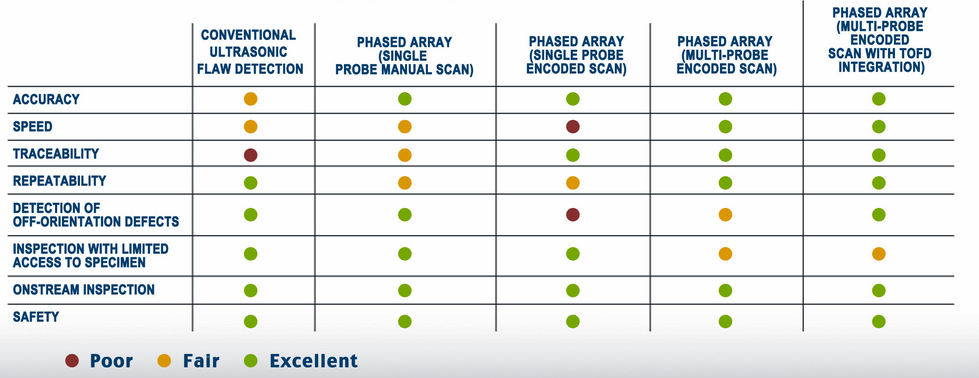
When selecting an advanced inspection company, it is important to consider that not all phased array techniques provide equal results. The table below lists some common considerations and compares various phased array techniques. Our experts are ready and prepared to work with you to provide the right combination, and tailor your phased array program to suit your specific needs.
Time of Flight (TOFD)
Reliability
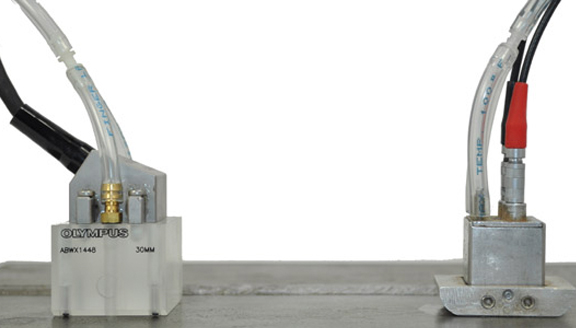
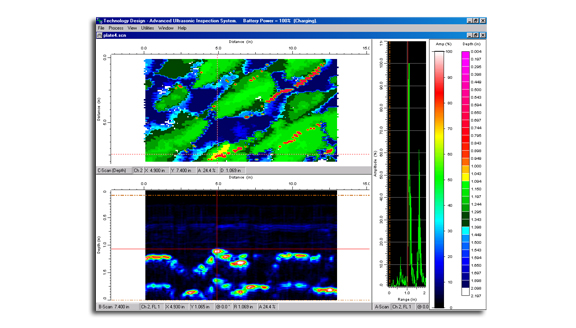
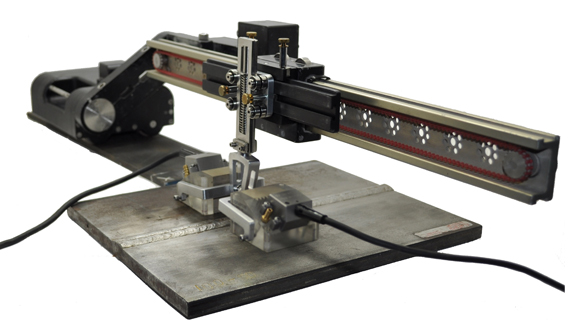
Time of Flight Diffraction is a quick and effective technique for detecting weld defects using advanced ultrasonics. TOFD operates on the principle that when struck by an ultrasonic wave, the tips of a crack will diffract signals differently than if no crack were present.A pair of ultrasonic probes is placed on opposite sides of a weld. The transmitter generates a lateral wave across the surface, and a compression wave reflects along the back wall of the test piece. If a crack is present, the ultrasonic wave is diffracted. The depth of the crack tip is then calculated using basic trigonometry. All the scans are encoded creating a digital image that can be used for flaw sizing and UT in lieu of radiography for code inspection welds.
Benefits of TOFD
In the inspection business, speed and accuracy are key. TOFD conducts a full volumetric inspection in one pass and produces immediate results, but precision is where the technique really shines. CIMA’s technicians use TOFD to provide you with the exact sizing and depth information you need to make the right call.

High Temperature Hydrogen Assessment (HTHA)
CIMA uses advanced nondestructive examination techniques, including Ultrasonic Frequency Analysis, to successfully detect and mitigate damage caused by High Temperature Hydrogen Attack. We have more than 15 years of experience scanning for HTHA and have found this damage mechanism in many vessels and exchangers, saving our clients from a future catastrophic failure.
What Is HTHA?
High Temperature Hydrogen Attack is a type of material degradation that occurs when steel is exposed to atomic hydrogen under high temperatures and pressures. Under these conditions, hydrogen molecules break apart. The individual hydrogen atoms diffuse into the alloy and react with the carbon in the steel, forming methane.
The resulting methane molecules are too large to diffuse through steel, so they accumulate, forming high-pressure pockets. These methane bubbles connect to form micro-fissures at internal surfaces like grain boundaries and voids.
In more advanced stages of HTHA, groups of micro-fissures join together to form cracks, leading to decarburization. Decarburization is the loss of carbon from the steel, making the metal weaker and less ductile.
Detecting HTHA
Traditional inspection methods are ineffective at detecting early-stage HTHA. Ultrasonic Testing will detect HTHA only in the later stages, when the methane-induced voids or cracks have grown significantly. Unfortunately, by this time the decarburization process has dramatically reduced the strength of the steel.
Ultrasonic Frequency Analysis is the best solution for detecting early-stage HTHA. Our technicians have been trained to recognize the unique velocity, frequency and backscatter patterns that are HTHA’s hallmarks.
With CIMAs experienced technicians and advanced inspection methods, it is possible to detect HTHA before it propagates to alarming and dangerous levels.
Automated Ultrasonics (AUT)
CIMA offers an array of automated ultrasonic testing techniques, designed to provide the timely and accurate information you need for maintenance planning. Our technicians use a multi-channel digital ultrasonic system with a robotic scanner to perform on-stream inspection.
CIMAs automated ultrasonic testing systems allow for superior productivity over conventional methods, logging up to 1.4 million thickness readings in a day. Data is collected and imaged digitally in real time. Superior repeatability and imaging capabilities make automated ultrasonics an excellent choice for monitoring critical flaw growth and determining defect size and growth rate.
Please read on for more information about our automated ultrasonic offerings:
Guided Wave
Guided Wave testing uses low frequency transducers to electromagnetically generate ultrasonic waves for long-range inspection and monitoring. Cima Inspection uses the state-of-the-art, easy to install Magnetostrictive Sensor (MsS) guided wave probe system to ensure the structural health of your pipelines.
MsS is used to rapidly survey long lengths of piping from a single test location to detect wall loss and cracking in above-ground lines, insulated or buried piping. The unique configuration of the transducer material aids in difficult inspection areas, high elevations, behind walls and road crossings. Permanent monitoring locations can be established for constant monitoring to obtain true, accurate and repeatable data.
About MsS Probes
MsS is cost effective, completely configurable for any pipe diameter, and can perform inspections at temperatures exceeding other guided wave techniques. MsS has lighter probes that save you thousands of dollars per transducer ring and are able to be permanently installed. These advantages make guided wave assessment fit better in your inspection budget.
Advantages of Our Guided Wave System
• Inspects the total cross-sectional wall of the pipe
• Detects corrosion, wall loss and cracks in above-ground, buried and insulated pipe
• Operates under elevated temperatures, up to 575 degrees Fahrenheit
• Adapts to any size of pipe with no limitations, as the MsS probes are made onsite
• Requires only 1 inch of clearance around the pipe for permanent monitoring
• Sophisticated analysis software increases probability of detection and allows for instant reporting
Guided Wave Applications
• Piping systems in oil, gas and petrochemical facilities
• Offshore piping systems/risers
• Power generation piping systems
• Road crossings/levee penetrations
• Elevated or complex piping systems with limited clearance/access
• Buried pipelines
Open Vision RTR (CUI)
Nondestructive testing has taken a giant step forward with the implementation of real-time radiography. CIMA deploys Open Vision, a state-of-the-art portable X-ray video scanner, to reliably scan for flaws in real time. The Open Vision system operates using a highly sensitive X-ray imager and a battery-operated 70kV X-ray tube designed for use in the field.
As safe as a hand-held X-ray machine, Open Vision only needs access to two sides of an object to produce a three dimensional perspective. CIMA technicians use Open Vision to scan piping from 1” up to 36” in diameter. Items can also be rotated during the inspection, resulting in better and faster inspection coverage.
The instantly produced images are presented on a high-resolution 6.5 inch LCD display or a head-mounted display. Both videos and still images can be stored for playback on any computer, preserving your inspection results for future reference or analysis.
Advantages of Open Vision
• Safer: Open Vision does not require radiation boundaries.
• Better detection: Corrosion may be extremely localized. Unless plugs are cut in the exact right spot, corrosion can be missed.
• Speed: The average technician can inspect 300 to 500 feet of pipe per day using Open Vision.
• Cost effective: Open Vision requires less labor and fewer materials than traditional methods, reducing the overall cost of the inspection.
Detecting Corrosion under Insulation
Corrosion under insulation is a severe form of corrosion where moisture has accumulated in a localized area and deterioration has begun. CUI can be elusive, as the moisture moves well beyond the break in the insulation.
CIMAs Open Vision system is ideal for detecting corrosion under insulation, where intruding water and repeated drying/wetting cycles can accelerate damage and result premature equipment failure. Open Vision is safer than traditional gamma ray profiling and certainly has many advantages over the old-fashioned method of cutting plugs in the insulation to allow for ultrasonic testing.
Eddy Current / Tubing Inspection
CIMA Inspection sets the industry standard for cost-effective, professional eddy current inspections of heat exchanger tubing, ensuring reliable operation for the life of your equipment. We offer inspections for both ferrous and non-ferrous tubing during scheduled and unscheduled shutdowns.
CIMAs tube inspection team is completely self-sufficient, arriving in our mobile command center van. This allows us to immediately turn around comprehensive, on-site reports for the equipment we inspect. Our 2D and 3D tube mapping, integrated database functionality and visualization applications, provide the data you need to make quick, informed decisions with confidence.
We are dedicated to helping you avoid failure and protect the bottom line in lost time and forfeited production. Read on to learn more about the advanced nondestructive testing techniques that make CIMA your one source for all heat transfer equipment inspection needs.
If the coil and its magnetic field approach is an electrically conductive material, a circular flow of electrons known as eddy current is induced into this electrically conductive material. In turn, this eddy current generates its own magnetic field, which will interact through mutual inductance with the coil and its magnetic field.
Defects in the material (cracks, pitting, wall loss or discontinuities) disrupt the flow of the eddy current and its magnetic field, thus also modifying the electrical impedance of the coil. When the meter sees a change in the magnetic field generated by the eddy currents, it displays a corresponding change in the signal on the screen.
NFT offers excellent detection of internal thinning and defects but is not designed to detect outside diameter flaws.
MFL is easy to automate, efficient and much more reliable than traditional magnetic particle testing. It is especially useful in the oil and gas industry for evaluating pipelines, tank bottoms and high pressure containers.
IRIS uses a unique water-driven rotating mirror to direct an ultrasonic beam, which is reflected 90 degrees to the internal tube wall. This gives you a complete and thorough wall dimension to assess tube condition. One pass inspection allows for sizing of inner and outer damage.
Imaging software and 100 percent data collection gives a quantitative inspection, enabling you to visualize the overall condition of each individual tube and make accurate decisions.
How CIMA Inspection Uses IRIS to Help You
IRIS is used to inspect a wide range of materials, including ferrous, nonferrous and non-metallic tubing. This technique detects and sizes wall loss resulting from corrosion, erosion, wear, pitting and baffle cuts. IRIS inspection technology is used extensively as a prove-up technique for remote field testing, magnetic flux leakage and eddy current inspections.
If the current is undisturbed, then the test piece is defect-free. A crack redirects the current and the disturbances are calculated to estimate the flaw’s size and length. Ideal uses for ACFM include in-service weld inspection and vessel crack detection. Data is recorded electronically for offline evaluation and stored for comparative ongoing monitoring.
Field Metal Replication
CIMA Inspection is able to carry out laboratory-grade metallurgical replication testing in the field using portable microscopes. Field metal replication is ideal for evaluating microstructure and surface flaws in equipment that would be excessively costly to shut down and transport for laboratory testing.
Field metal replication is an ideal complement to other forms of nondestructive testing, confirming the nature of flaws indicated by other methods. Photographic reports can be recorded to support ongoing monitoring or analysis.
Positive Material Identification
With positive material identification, CIMA Inspection can quickly analyze metallic alloys to accurately establish their composition. Improper mixing of specified materials can lead to catastrophic failure in applications involving high or low pressure, hazardous materials, or critical material specifications.
The most popular method of positive material identification uses X-ray fluoroscopy. Radiation is induced to excite the test material, and which bounces back element-specific radiation that is measured and compared to a set of pre-programmed material grades. This method works quite well to identify some low-alloy steels, most high-alloy steels, and select other metal alloys.
The second method, optical emission spectroscopy, uses a spark or arc to excite the test material, producing a full spectrum of light wavelengths for measurement. This results in a quantitative makeup percentage of all metals and alloys, including those that don’t respond well to x-ray fluoroscopy.
Positive material identification is ideal for establishing the composition of base components, as well as welds, bolting and gaskets. These methods can be used without damaging the material, and results are available immediately.

